- 2025 ~
- ~ 2023
Getting Started
How to Connect
Direct Connection
Directly connect a keyboard and monitor to the ROBOTIS-OP3's main controller.
Remote Connection
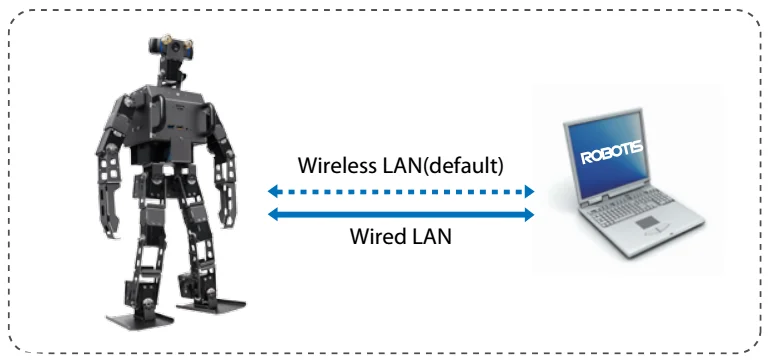
Connect to ROBOTIS-OP3 over the network.
Connection Type
-
Wireless Network (WLAN)
Connect to the ROBOTIS-OP3-Share network broadcast by the OP3 when powered on. After establishing a Wi-Fi connection, use one of the connection methods described in the next section to control the robot. (Default Network Password : 111111) -
Wired Network (Ethernet)
To use a wired connection, connect the ROBOTIS OP3 to the same Router as your remote PC so the OP3 can connect as a DHCP client.
How to Connect
-
SSH
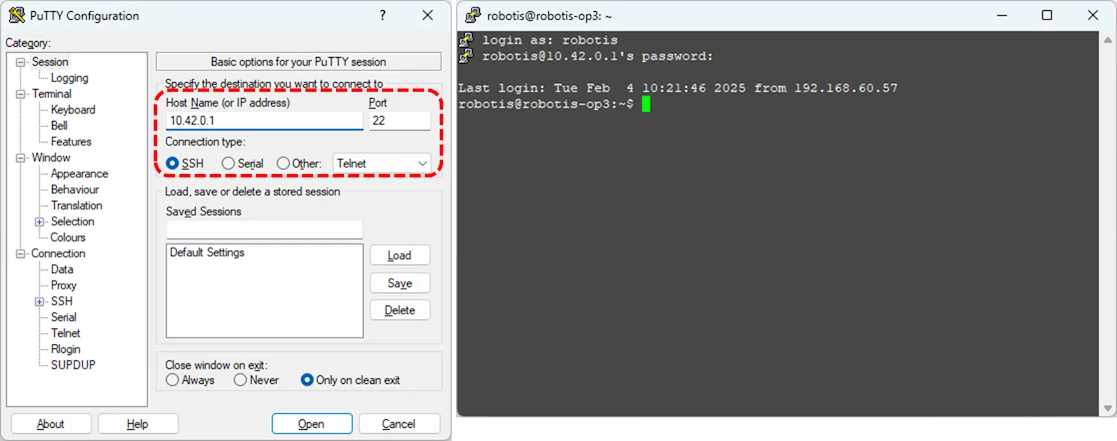
- Execute SSH client program (ex: PuTTY)
- Input the ROBOTIS-OP3’s IP address : 10.42.0.1
- Select SSH as a connection type and then initiate the connection.
- Input ROBOTIS-OP3’s user name (Default: robotis)
- Input ROBOTIS-OP3’s password (Default: 111111)
-
VNC
CAUTION : The robot must be booted with a physical monitor connected for VNC connection to work.
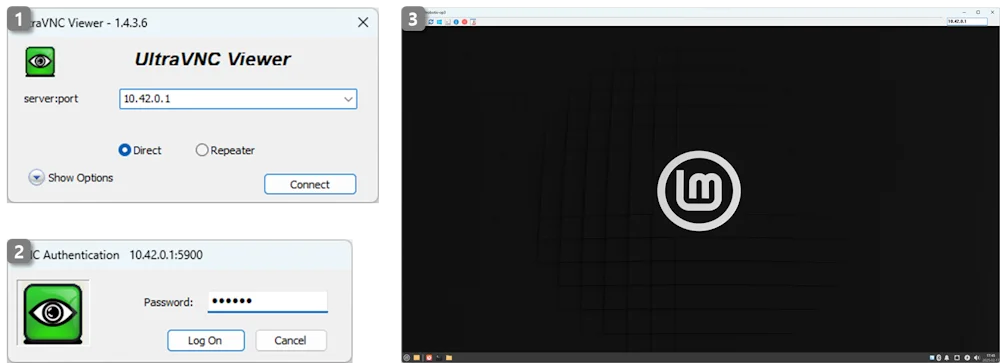
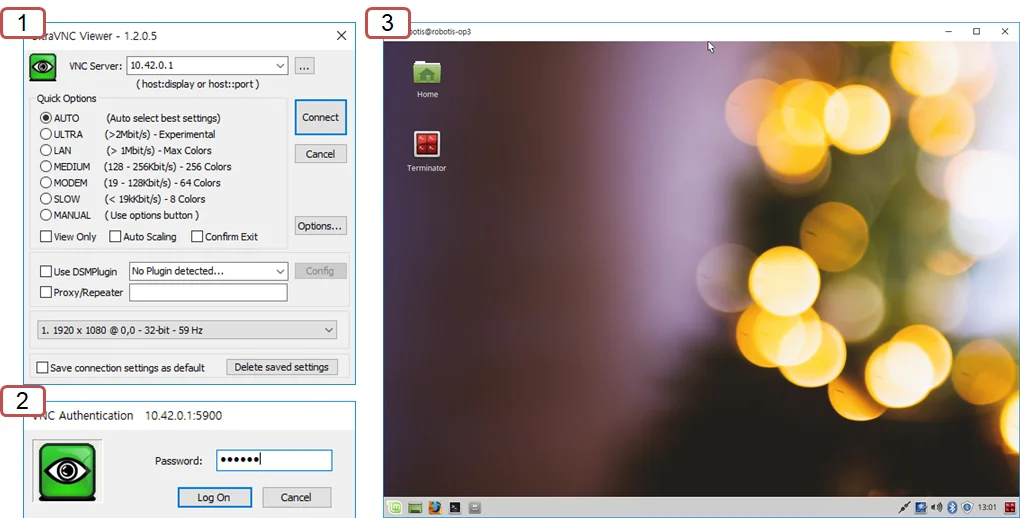
- Execute VNC client program (ex: Ultra VNC Viewer)
- Input ROBOTIS-OP3’s IP address : 10.42.0.1
- Input ROBOTIS-OP3’s password : 111111
- Accessing the ROBOTIS-OP3 via remote desktop may result in slower performance.
How to stop the demo program
Stop the demo program
In order to terminate the demo program, enter the command below in a terminal window.
$ sudo systemctl stop op3_demo.service
Running the demo at startup
This chapter explains how to set up the system to automatically run a demo at startup.
Automatically run the demo program at startup
-
Create a systemd service file
Create a new systemd service file at/etc/systemd/system/op3_demo.serviceusing a text editor:$ sudo nano /etc/systemd/system/op3_demo.serviceCopy and paste the following content into the file:
[Unit]Description=Starts the op3_demo launch fileAfter=network.target systemd-user-sessions.service[Service]Type=simpleUser=robotisGroup=robotisWorkingDirectory=/home/robotis/robotis_wsExecStartPre=/bin/sleep 3ExecStart=/bin/bash -ic 'ros2 launch op3_demo demo.launch.xml'Restart=alwaysRestartSec=1KillMode=control-groupLimitRTPRIO=99LimitNICE=-20[Install]WantedBy=multi-user.targetSave and exit (
Ctrl + X, thenYandEnter). -
Reload the systemd daemon
After creating the service file, reload the systemd daemon to recognize the new service:$ sudo systemctl daemon-reload -
Enable the service at boot
Enable the service so that it starts automatically when the system boots:$ sudo systemctl enable op3_demo
Disable automatic startup of the demo program
- Disable the service
This prevents the service from starting automatically at boot:$ sudo systemctl disable op3_demo - Stop the running service (if active)
If the service is currently running, stop it with:$ sudo systemctl stop op3_demo - Remove the service file (optional)
If you no longer need the service, you can delete the service file:Then, reload the systemd daemon to apply the changes:$ sudo rm /etc/systemd/system/op3_demo.service$ sudo systemctl daemon-reload
How to restart the demo program
When to restart the demo
- When camera has lost its connection due to electrical or mechanical issues.
- When the U2D2 has lost its connection due to electrical or mechanical issues.
- When resetting connected DYNAMIXELs with the Reset button due to a DYNAMIXEL error.
How to restart the demo
In order to restart the demo, execute the following command in a terminal window.
(password : 111111)
$ sudo systemctl restart op3_demo
Getting Started - (~ 2023)
How to Connect
Direct Connection
Keyboard and monitor are directly connected to ROBOTIS-OP3.
Remote Connection
Connect to ROBOTIS-OP3 over the network.
Connection Type
-
Via Wireless(WLAN)
IP address will be automatically assigned when connecting to ROBOTIS-OP3-Share.
After establishing Wi-Fi connection, use one of the connection methods described in the next section. (password : 111111) -
Via Wired(Ethernet)
When using wired connection, connect ROBOTIS OP3 to the same Router with PC so that OP3 can be connected as a DHCP client.
How to connect
-
SSH
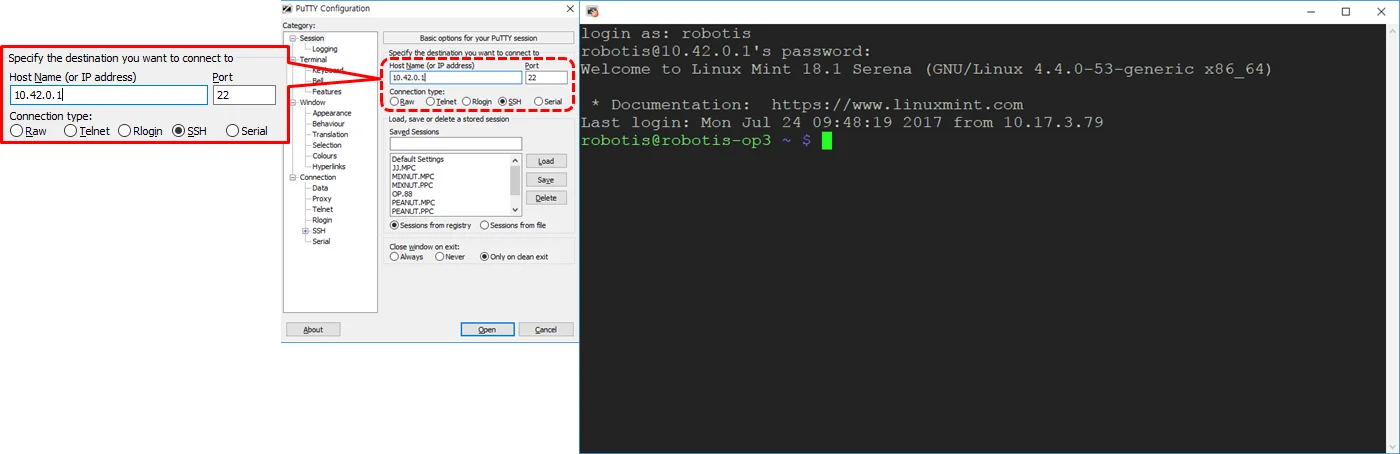
- Execute SSH client program (ex: PuTTY)
- Input ROBOTIS-OP3’s IP address : 10.42.0.1
- Select SSH as a connection type and then open it.
- Input ROBOTIS-OP3’s user name : robotis
- Input ROBOTIS-OP3’s password : 111111
-
VNC
- Execute VNC client program (ex: Ultra VNC Viewer)
- Input ROBOTIS-OP3’s IP address : 10.42.0.1
- Input ROBOTIS-OP3’s password : 111111
- Accessing ROBOTIS-OP3 via remote desktop may result in slower performance.
How to kill the demo program
Kill demo program
In order to terminate automatically executed demo program, enter below command in the terminal window.
$ sudo service OP3-demo stop
Running demo on startup
This chapter describes settings for automatically executing demo on startup.
Autorun feature requires robot_upstart package from ROS.
Reference : robot_upstart
Start demo program on start
- Make a script for auto-run
Open a new terminal window and execute below commands.
(password : 111111)$ rosrun robot_upstart install --job JOB_NAME --user root --master http://10.42.0.1 op3_demo/launch/demo.launch- JOB_NAME : This item specifies job name to autorun. The job name will be registered on the service.
ex : OP3-demorosrun robot_upstart install --job OP3-demo --user root --master http://10.42.0.1:11311 op3_demo/launch/demo.launch - NOTE : Autorun program will be generated based on
op3_demo/launch/demo.launch.
- JOB_NAME : This item specifies job name to autorun. The job name will be registered on the service.
- Modify the script
- open service file and modify the contents
$ sudo xed /usr/sbin/OP3-demo-start
- from :
export ROS_HOSTNAME=$(hostname) - to :
export ROS_HOSTNAME=10.42.0.1
- from :
- Run the service
$ sudo systemctl daemon-reload && sudo systemctl start JOB_NAME
daemontoolsInstallation : Ifdaemontoolsis not installed on the system, execute below command.$ sudo apt install daemontools
Stop demo program on start
Open a new terminal window and execute following commands.
$ rosrun robot_upstart uninstall JOB_NAME
How to restart the demo program
When to restart the demo
- When camera has lost its connection due to electrical or mechanical issue.
- When USB2DYNAMIXEL has lost its connection due to electrical or mechanical issue.
- When resetting DYNAMIXEL with Reset button due to DYNAMIXEL error.
How to restart the demo
In order to restart autorun demo, execute following command in the terminal window.
(password : 111111)
$ sudo service OP3-demo restart